The injection molding process is not without its challenges, particularly when it comes to defects that can compromise quality. Recognizing and addressing injection molding defects is essential for manufacturers to ensure product quality, reduce waste, and optimize production efficiency.
This guide goes deep into the most common issues, offering insights into their causes and outlining effective solutions to ensure optimal outcomes.
What Are the Most Common Injection Molding Defects?
Despite the injection molding’s efficiency and versatility, certain challenges, particularly defects, can arise, impacting the quality and usability of the final products.
These defects not only compromise the aesthetic and structural integrity of the parts but also reflect the complexity of the injection molding process. Understanding why these defects occur is the first step toward mitigating them, ensuring the production of high-quality, defect-free parts.
Flow Lines
Flow lines are among the most visually apparent defects in injection-molded parts, appearing as streaks or lines on the part’s surface.
These lines often display a slightly different color or shade than the rest of the material, indicating areas where the molten plastic cooled at different rates.
Description and Visual Characteristics
Flow lines resemble waves or patterns on the surface of molded parts, sometimes visible as ring-like lines near the gates. Their presence often indicates variations in the flow speed of the molten plastic within the mold cavity.
Causes of Flow Lines
Several factors contribute to the formation of flow lines, including the speed of injection, pressure, and temperature of the molten plastic. A slow injection speed or low pressure can lead to premature cooling of the plastic as it fills the mold, resulting in these undesired lines.
How to Prevent and Fix Flow Lines
Adjusting the injection speed and pressure can significantly mitigate flow lines. Increasing the temperature of the molten plastic and the mold can also help by ensuring a more uniform flow and cooling process.
Strategic placement of gates and optimizing the design of the mold to facilitate a smoother flow can prevent the occurrence of flow lines.
Sink Marks
Sink marks are depressions or indentations on the surface of injection-molded parts, typically occurring in thicker areas where the outer shell cools and solidifies before the inner material does.
Sink marks are essentially voids that occur due to the insufficient pressure in the mold cavity during the cooling and solidification phases. They are more common in designs with varying wall thicknesses.
Common Causes of Sink Marks
The primary cause of sink marks is the differential cooling rate between the thicker and thinner sections of the part. Insufficient pressure during the packing phase of the injection molding process also contributes to this defect.
Strategies for Prevention and Correction
To prevent sink marks, ensure uniform wall thickness throughout the part design. Adjusting the holding pressure and time can also help, as it compensates for the material shrinkage in thicker sections. Additionally, optimizing the cooling system within the mold to ensure even cooling can significantly reduce the incidence of sink marks.
Surface Delamination
Surface delamination refers to a defect where the surface of the molded part splits or peels away, revealing layers beneath. This not only affects the part’s appearance but can also weaken its structural integrity.
Delamination occurs when thin layers of the plastic part’s surface separate from the base material. These layers can sometimes be peeled off, indicating poor bonding between the material layers.
Factors Leading to Delamination
Contaminants in the plastic material, such as foreign particles or moisture, are primary culprits for delamination. Inadequate material preparation, including improper drying of hygroscopic resins, can also lead to this defect.
Solutions to Prevent Delamination
Ensuring the plastic resin is properly dried and free from contaminants is critical in preventing delamination. Adjusting the mold temperature to optimize material flow and bonding can also help. Additionally, incorporating a more homogeneous material mixture and avoiding excessive mold release agents contribute to reducing the risk of surface delamination.
Weld Lines (Knit Lines)
Weld lines, also known as knit lines, form when two flow fronts of molten plastic meet and solidify without bonding completely. These lines often appear as visible marks on the surface of injection molded parts, potentially compromising their aesthetic appeal and structural integrity.
Why Weld Lines Occur
Several factors contribute to the formation of weld lines, including the design of the mold, the speed of the injection process, and the properties of the plastic material used. Inadequate venting in the mold and insufficient injection pressure may also lead to the formation of these imperfections.
Preventative Measures and Solutions
Improving the mold design to ensure a more uniform flow of plastic can significantly reduce weld lines. Optimizing injection speed and pressure, along with selecting suitable materials, enhances the chances of molten plastic fronts merging successfully. Adjusting the temperature of the mold and the molten material can also help in minimizing these defects.
Short Shots
Short shots occur when the molten plastic does not fill the mold cavity completely, resulting in incomplete parts. This defect often leads to wasted materials and time, affecting the efficiency of the production process.
Reasons Behind Short Shots
Insufficient injection pressure or speed, improper calculation of shot size, and inadequate heating of the plastic material are common causes of short shots. Complex mold designs with thin walls or distant cavities can also make it challenging for the molten plastic to fill the entire mold.
How to Avoid and Remedy Short Shots
Enhancing the injection pressure and speed can address short shots effectively. Ensuring that the molten plastic is at the correct temperature for optimal flow and adjusting the shot size calculation for each specific mold design are critical steps. Simplifying the mold design or incorporating multiple injection points can also prevent this defect.
Warping
Warping is a distortion that occurs in parts as they cool and solidify. This defect is usually the result of uneven cooling rates across the part, leading to internal stresses that warp the final product.
Tips for Preventing Warping
Ensuring uniform cooling throughout the part is essential in preventing warping. This can be achieved by designing molds with even wall thicknesses and optimizing cooling channels. Controlling the temperature of the mold and the plastic material, as well as adjusting the cooling time, can also help maintain the part’s intended shape.
Jetting
Jetting occurs when the molten plastic material is injected into the mold cavity at a high speed, leading to the formation of snake-like lines or streaks on the surface of the molded part.
This defect is often a result of the molten plastic material being pushed against the mold wall too forcefully, causing it to cool and solidify prematurely before the rest of the material fills the cavity.
How to prevent Jetting
Preventing jetting requires careful adjustments to the injection speed and pressure, ensuring that the molten plastic enters the mold cavity in a controlled manner. Modifying the gate design to facilitate a smoother flow of material and optimizing the temperature of both the mold and the plastic material can also significantly reduce the occurrence of jetting.
Solutions for Mitigating Jetting Effects
Addressing jetting involves revisiting the mold design, particularly the gate location and size, to ensure a uniform distribution of the molten plastic across the mold cavity. Additionally, adjusting the processing parameters such as the injection speed, pressure, and temperature settings can help minimize the risk of jetting. In some cases, increasing the mold temperature to reduce the viscosity of the molten plastic allows for a smoother fill of the mold cavity, effectively mitigating jetting.
Vacuum Voids
Vacuum voids are air pockets that form within the interior of a molded part, resulting from trapped air that fails to escape the mold cavity during the injection process. These voids can compromise the structural integrity and appearance of the part, making it essential to identify and address the underlying causes.
Strategies to Avoid Vacuum Voids
Ensuring proper venting in the mold design is crucial for allowing trapped air to escape from the mold cavity. Additionally, optimizing the mold and melt temperatures can facilitate a better flow and filling pattern, reducing the likelihood of air becoming trapped.
Adjusting the injection speed and pressure to ensure that the molten plastic fully fills the mold cavity without trapping air can also prevent the formation of vacuum voids.
Discoloration
Discoloration in injection-molded parts can result from a variety of factors, including the degradation of the plastic material due to excessive heat, contamination of the material with foreign substances, or issues with the colorant used in the material.
It is a visible defect that affects the aesthetic quality of the part and can indicate underlying issues with the molding process or material handling.
Methods to Prevent Discoloration
To prevent discoloration, it is essential to carefully monitor and control the temperature of the mold and the plastic material to prevent overheating and degradation. Ensuring that the plastic material is properly dried and free from contaminants before use can also help maintain color consistency.
Additionally, using high-quality colorants and mixing them thoroughly with the plastic resin ensures that the color is evenly distributed throughout the part.
Flash
Flash, also known as burrs or spew, manifests as thin layers of plastic that escape from the mold cavity, usually found along the parting line, ejector pins, and gate areas.
This excess material occurs when the molten plastic finds its way into the small gaps between the mold components due to high injection pressure or inadequate clamping force.
How to Eliminate Flash
To prevent flash, ensuring that the mold is correctly aligned and the clamping force is sufficient to counter the injection pressure is crucial. Regular maintenance and inspection of the mold to identify and repair any damages or wear can also significantly reduce the likelihood of flash.
Additionally, optimizing the injection pressure and speed can help minimize this defect without compromising the quality of the molded part.
Splay Marks (Silver Streaking)
Splay marks, or silver streaks, appear as silvery or translucent streaks on the surface of injection-molded parts. They are often caused by moisture in the material, excessive injection speed, or the presence of foreign materials in the plastic resin.
Preventative Tips for Splay Marks
Ensuring the plastic resin is thoroughly dried before use is one of the most effective ways to prevent splay marks. Adjusting the injection speed and pressure to optimal levels can also reduce the occurrence of this defect. Regular cleaning and maintenance of the hopper, dryer, and feeding system will help eliminate contaminants that could lead to splay marks.
Bubbles and Voids
Bubbles and voids are trapped air pockets within or on the surface of injection-molded parts. Bubbles are typically found near the surface and result from trapped gas during the injection process. Voids, however, are located within the part, often in thicker areas, and occur when the outer material cools faster than the core, creating a vacuum.
Solutions to Prevent Bubbles and Voids
To prevent bubbles and voids, it is essential to optimize the mold and melt temperature, ensuring uniform cooling of the part. Proper venting in the mold design is also crucial to allow air to escape from the cavity. Additionally, adjusting the injection speed and pressure can help minimize the risk of trapping air during the molding process.
Burn Marks
Burn marks in injection molding appear as black or brown discolorations, typically at the ends of the flow path or near the gate locations. These marks are not just surface-level issues; they can indicate more profound problems within the injection process, such as overheating or excessive injection speed.
Preventing and Fixing Burn Marks
Preventing burn marks requires a nuanced approach to managing the injection speed and pressure to ensure that the molten plastic does not overheat. Reducing the temperature and adjusting the mold design to improve airflow can also help. For existing burn marks, reviewing and modifying processing parameters and possibly consulting on mold design improvements are effective strategies for mitigation.
Gate Vestige
Gate vestige refers to the small piece of plastic that remains on the part after it has been ejected from the mold, a remnant of the gate through which molten plastic enters the mold cavity. While sometimes minimal, it can be problematic for the fit, function, or aesthetics of the final product.
How to Minimize Gate Vestige Appearance
Minimizing gate vestige involves refining the gate design and optimizing the injection molding process parameters. Utilizing sub-gate or tunnel gate designs can allow for automatic trimming during ejection, reducing manual labor and improving the appearance and consistency of the final product.
Injection Molding Material Defects
Material defects in injection molding can significantly affect the quality and integrity of the manufactured parts. These defects are often related to the properties of the plastic material used, the conditions under which it’s processed, and the specific methodologies applied during the molding and cooling phases.
Material Degradation
Material degradation happens when the polymer breaks down due to excessive heat, shear stress, or interaction with chemical agents. This breakdown can lead to a loss of mechanical properties, discoloration, and a decrease in the overall quality of the injection-molded part.
How to Prevent Material Degradation in Injection Molding
To prevent material degradation, it’s crucial to control the processing conditions meticulously. This includes monitoring and optimizing the melt temperature, injection speed, and back pressure to avoid overheating and excessive shear forces. Additionally, ensuring that the material is dry and properly handled before processing can help maintain its integrity.
Brittleness
Brittleness in injection molded parts occurs when the material does not retain enough flexibility, leading to cracks or breaks under stress. This can be caused by improper material selection, excessive cooling rates, or the presence of too much regrind material, which might degrade the polymer’s structural integrity.
Strategies to Overcome Brittleness
Overcoming brittleness involves carefully selecting materials that match the application’s specific requirements for strength and flexibility. Adjusting processing parameters to ensure adequate cooling without rapid temperature drops can also help. Additionally, limiting the amount of regrind used and ensuring the material is dry before processing can improve the part’s resilience.
Mold Design and Maintenance Defects
Optimal mold design and regular maintenance are foundational to successful injection molding operations. They directly affect the quality of the parts produced and the efficiency of the production process.
Poor Mold Design
Poor mold design can lead to a variety of defects, including warping, sink marks, and weld lines. Inadequate venting, improper gate location, or unsuitable runner systems can cause inconsistent material flow and cooling, resulting in parts that do not meet specifications.
Principles of Effective Mold Design
Effective mold design requires a comprehensive understanding of the material properties, part geometry, and intended use of the final product. Key principles include ensuring uniform wall thickness, strategic placement of gates and runners, and adequate venting to prevent defects. Simulation tools can be invaluable in predicting and addressing potential issues before mold construction.
Inadequate Mold Maintenance
Regular maintenance is critical to prevent mold wear and damage that can lead to defects. Neglecting maintenance can result in issues like improper alignment, surface degradation, and the accumulation of residues, all of which can affect part quality.
Maintenance Tips for Preventing Defects
Implementing a regular maintenance schedule that includes cleaning, inspection, and repair of the mold can significantly reduce the risk of defects. Special attention should be given to areas prone to wear and tear, and any damaged components should be replaced promptly to maintain the quality of the parts produced.
How to Identify and Troubleshoot Injection Molding Defects?
Identifying, verifying and troubleshooting injection molding defects require a systematic approach to diagnose and solve common issues affecting the quality of molded parts.
By following a step-by-step process, manufacturers can effectively address these challenges, ensuring the production of high-quality components.
- Visual Inspection: Begin with a thorough visual inspection of the part to identify any visible defects such as flash, weld lines, or discoloration.
- Review Processing Parameters: Examine the injection molding machine’s settings, including injection pressure, speed, and temperature, to ensure they align with the material’s requirements and part design.
- Material Quality Check: Verify the quality and condition of the plastic resin, ensuring it is dry and free from contaminants.
- Mold Inspection: Inspect the mold for signs of wear, damage, or improper venting that could contribute to defects.
- Simulation Software: Utilize simulation software to predict and analyze the flow of molten plastic within the mold, identifying potential issues before they occur.
What are Advanced Technologies and Innovations in Reducing Injection Molding Defects?
Injection molding technology is continuously evolving, with advancements in technology and innovation playing pivotal roles in reducing defects and enhancing product quality.
These technological advancements have revolutionized the way manufacturers approach the injection molding process, offering more precise control, better quality assurance, and minimized waste.
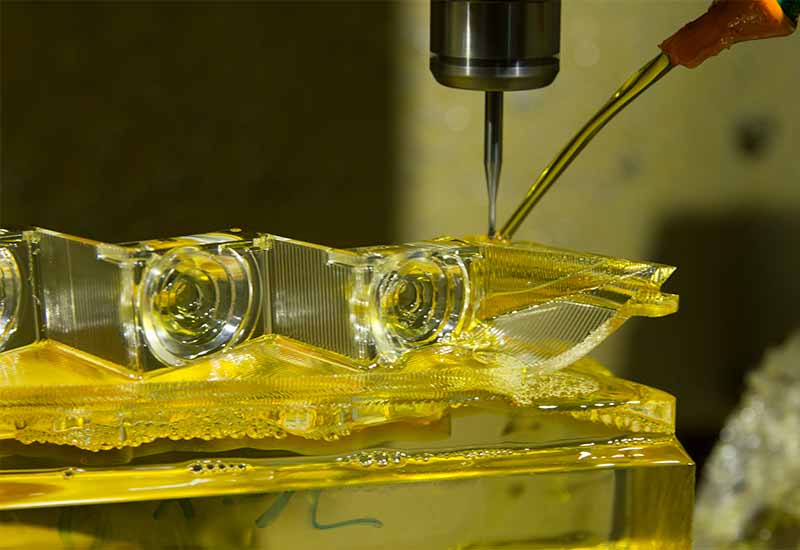
- 3D Printing for Mold Making: The integration of 3D printing technology in mold making allows for rapid prototyping and testing. This innovation helps in identifying potential molding issues before mass production, reducing the risk of defects.
- Simulation Software: Advanced simulation software provides a virtual visualization of the molding process, including flow, cooling, and warping. This predictive analysis helps in making necessary adjustments to avoid common defects such as sink marks and air traps.
- Automated Quality Control Systems: Automation in quality control, including vision systems and AI-driven defect detection, has significantly improved the ability to identify and rectify defects early in the production cycle.
- Precision Temperature Control Systems: These systems provide more accurate control over the mold and melt temperatures, crucial for reducing warping, sink marks, and residual stresses in the molded parts.
What is The Role of Quality Control in Injection Molding?
Quality control (QC) in injection molding is critical to ensuring the production of high-quality parts that meet or exceed customer expectations. Effective QC involves a series of strategic measures and checks throughout the production process, from the raw material to the final product.
Strategies for Implementing Effective Quality Control Measures
Implementing effective QC measures in injection molding involves several key strategies:
- Comprehensive Material Inspection: This includes checking the plastic resin for moisture, contamination, and consistency to ensure it meets the required standards.
- Regular Mold Maintenance and Inspection: Ensuring the mold is in optimal condition, free from wear or damage, and properly aligned to prevent defects.
- Process Monitoring and Control: Continuous monitoring of process parameters such as temperature, pressure, and injection speed to maintain optimal conditions throughout the production cycle.
- Final Product Inspection: Utilizing both manual inspections and automated systems to identify and address any defects in the final product.
- Training and Development: Investing in ongoing training for staff to understand the complexities of the molding process and the importance of quality control.
Conclusion
The continuous evolution in injection molding technologies and the implementation of quality control measures play crucial roles in minimizing defects and enhancing the overall quality of the molded parts.
From leveraging advanced 3D printing for mold making to employing sophisticated simulation software and automated quality control systems, these innovations offer manufacturers the tools to produce high-quality products efficiently.
By integrating new technologies and adhering to strict quality control protocols and proven established practices, the industry can achieve greater reliability, reduced waste, and increased customer satisfaction.
As a leading provider of injection molding services, 3erp ensures the highest standards of quality across the entire manufacturing process. With a comprehensive inspection and quality control system, we guarantee that every project meets your exact requirements and you will receive injection molded parts free of defects.
Our commitment to quality assurance encompasses incoming materials inspection, first article and in-process inspection, and rigorous final inspection and testing, complete with detailed reports and certifications before shipping.
Equipped with state-of-the-art tools such as X-RAY Material Tester, On-Machine Inspection System, Projector, and Coordinate Measuring Machine, 3erp is dedicated to delivering excellence in every aspect of our service.