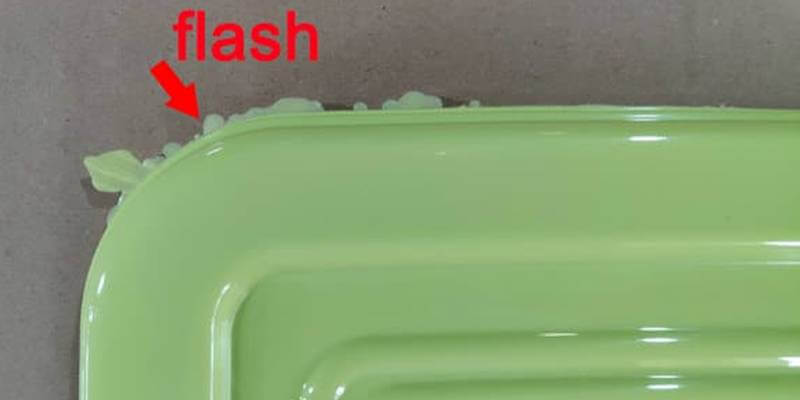

Flash or flashing is one of the most common problems associated with injection molding, the most widely used manufacturing process for plastic parts.
Injection molding flash is when a line of excess material builds up on the outside of a molded part, typically after leaking through the parting line of the mold. A small amount of flash is normal, but too much can affect the cosmetic appearance, surface texture, and assembly of parts.
This article looks at the main strategies for preventing injection molding flash, as well as methods for removing flash (deflashing) after the molding process is finished.
What is injection molding flash?
Flash is excess plastic that forms on the surface of parts made by plastic injection molding (or similar processes like casting). In most cases, flash occurs when material escapes between two mold halves, at the parting line.
Injection molding flash can vary in severity. Molded parts will almost always display witness marks — signs of tooling features like core pins — and product designers should design parts so these marks are as inconspicuous as possible. One type of witness mark is the witness line: a line on the molded part that shows the parting line of the mold halves.
Flash can be considered a more severe case of a witness line. Flash is not only visible on the surface, it physically protrudes from it. This can cause numerous issues: the flash may be sharp, making the part dangerous to handle, or it may prevent the part from mating with other components due to its reduced dimensional accuracy.
Injection mold flash can have several causes, including:
- Poor alignment between mold halves
- Worn, damaged, or dirty molds
- Poor venting
- Unbalanced plastic flow
- Insufficient clamping force
- Low plastic viscosity
In general, up to 0.1 mm of flash is considered acceptable unless the part has unique needs in terms of surface flatness. It is possible to reduce flash below this amount, but the cost of tooling may increase.
Preventing flash
Preventing or minimizing flash can involve steps at both the moldmaking and molding stage. Better molds are less likely to produce flash, but proper handling of the molding process is also essential to minimize flash and other injection molding defects.
Tooling improvements
Most flash occurs at the parting line of the two mold halves, which makes the mold halves themselves obvious culprits. When the mold halves are not properly aligned and do not fit snugly together, they cannot properly close, which allows material to escape. This escaped material then solidifies as flash on the outside of the moldings.
During the toolmaking stage, the process of mold fitting is carried out to ensure that the mold halves fit together properly without gaps that can cause flash. If the mold halves are not properly aligned, it becomes very difficult to eliminate flash.
Toolmakers are also responsible for the venting of a mold. Vents in the tooling allow air to escape, which enables the molten plastic to fill the mold cavity entirely. Proper venting can also minimize flash. How? Poorly vented molds require higher injection pressures, which can end up forcing the two mold halves apart, creating a gap between them which leads to flash.
Another tooling consideration is flow paths. If some flow paths to the mold cavity are longer than others, unbalanced filling can occur, leading to discrepancies and air traps throughout the mold cavity. Unbalanced flow can also cause flash. Flow leaders and deflectors can be used to ensure balance during filling.
Of course, molds are not indestructible, and wear over time can worsen mold alignment and create gaps that lead to flash. Mold maintenance and refitting should be carried out if the two halves do not fit snugly together, in addition to regular cleaning to prevent buildup or dirt and debris that can prevent effective clamping.
The mold’s parting line placement is another important consideration during the initial moldmaking stage. Although this does not prevent flash, it can ensure that flash occurs in a location that minimizes its aesthetic and functional impact on the part.
Molding process improvements
A well fitted mold is less likely to produce flash, but the molding process itself also contains several variables that can affect the extent of flash on molded parts.
One of the most common causes of excessive flashing is insufficient clamping force. Clamping forces — typically applied via hydraulic or mechanical clamping systems — are required to keep a mold closed during injection, and they must counter the pressure of the injection itself. If the clamping force is insufficient, the mold can open slightly, allowing material to escape and flash to form. High-viscosity materials and thin-walled parts require greater clamping forces.
Uneven clamping and molding forces can lead to other issues like mold deflection, which can also lead to increased flash.
The nature of the molding material can also affect flash. Low-viscosity molten plastic is more likely to escape from the mold and cause flash because it flows more freely and can therefore seep through gaps in the parting line. Although some plastics have inherently low viscosity, the viscosity can be increased by using a lower melt temperature in the molding machine.
Removing flash
Injection molding flash cannot always be prevented prior to molding. Fortunately, it is possible to remove flash from molded parts using post-processing techniques. Removing injection molding flash from finished moldings is sometimes called deflashing. Getting rid of flash is easier on soft materials like silicone rubber but is also possible on hard plastics.
One deflashing method is to use manual tools like a knife or file. The benefit of this method is the accuracy: since a human operator is responsible for deflashing, they are able to identify what is waste material (flash) and what isn’t. It is also the most suitable approach for brittle parts that could be damaged by machine-based deflashing methods. But this process is expensive at scale, since the process must be repeated for each individual molding.
Another deflashing option is using a tool and die system. With this approach, the molding is placed within a die shaped like the final part and punched through the opening to quickly remove flash. This option is typically faster than manual trimming for very large batches, though it requires extra machinery and is still slower than batch deflashing processes.
If manual or die punch flash removal is not possible, batch deflashing processes can be employed. These processes are much faster than manual deflashing, but there is a risk that pieces of the component will be broken off accidentally.
One batch deflashing technique involves using blast media, which can remove excess material like flash from the finished moldings. A related method is tumbling, in which the moldings are put in a vibrating chamber along with non-abrasive media like ceramic beads. These techniques can rapidly remove flash from multiple parts but may not be suitable for delicate or brittle components.
Blasting and tumbling can both be assisted by cryogenic freezing of the moldings. By using a cryogen like liquid nitrogen, operators can make the flash extremely brittle, which allows it to be more easily removed via blasting or tumbling. Using cryogenic deflashing and cryogenic deburring techniques can help maintain critical tolerances and consistency between parts.
Molding with 3ERP
3ERP is a prototyping and small-batch production specialist with years of experience making injection molded parts. We offer a range of injection molding services with several finishing options to ensure high-quality parts with minimal flash.
Request a free quote today.